Round Trip Quilts, Stop #2

It’s been 6 weeks, so it’s time for our quilts to continue their journey!  I joined the Round Trip Quilt bee, which is made up of US and Canada bloggers that met through the New Blogger Group from Plum and June.  We are a pretty relaxed and free form bee group.  We don’t make (necessarily) an entire border all the way around each time, and we usually (but not always) sew an additional piece to one or more sides of the quilt.  I love our rules because as a group, there are some amazing quilts taking shape.

Round Trip Quilts - Christina

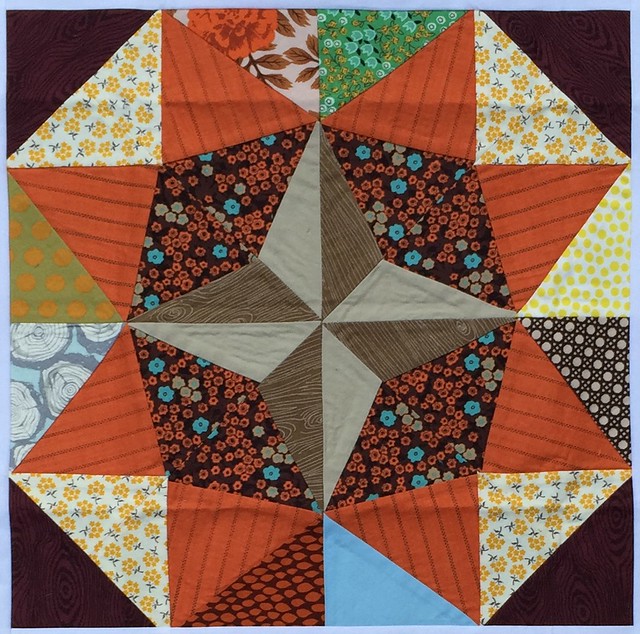
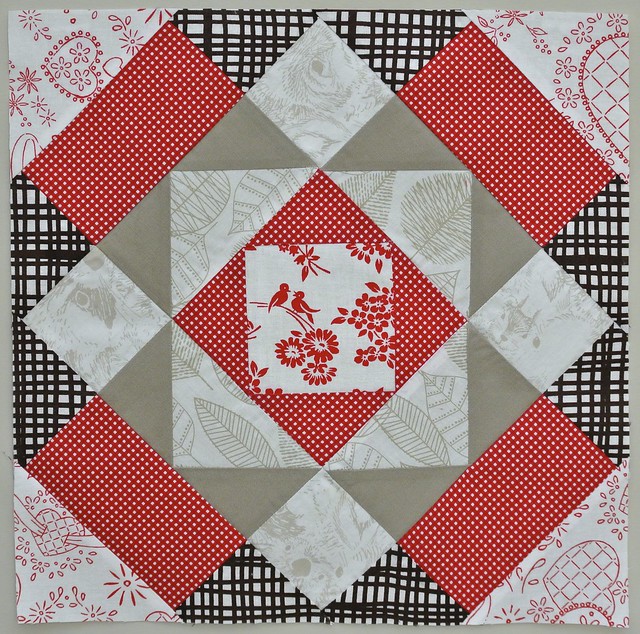
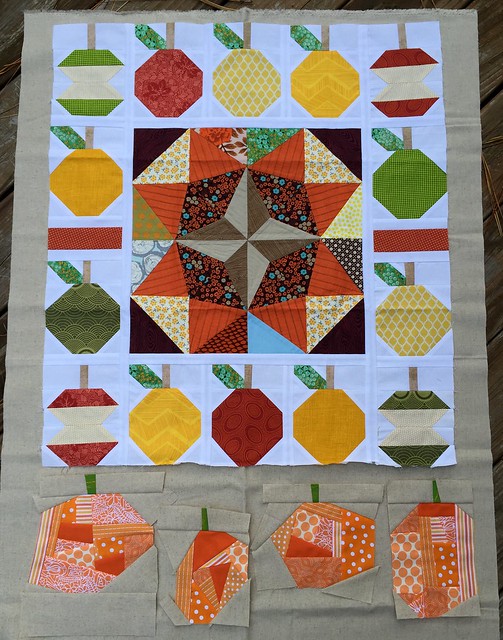
This round I have an autumn themed quilt from Christina at Wips and Tuts.  She used the center medallion from the Liberty medallion quilt that went around quilty blog-land awhile ago.  It’s from the book Liberty Love by Alexia Marcelle Abegg (affiliate link).  This is such a fantastic medallion center, and it’s being added to my never ending bucket list of quilts.

As soon as I saw her initial blog entry explaining the theme of her quilt, I got excited.  I love fall, and I was fortunate enough to get this quilt during fall.  It felt perfect.  Then I discovered I had more ideas than I could easily narrow down!  Seriously, my Round Trip Quilts pinterest board is over half autumn block ideas.

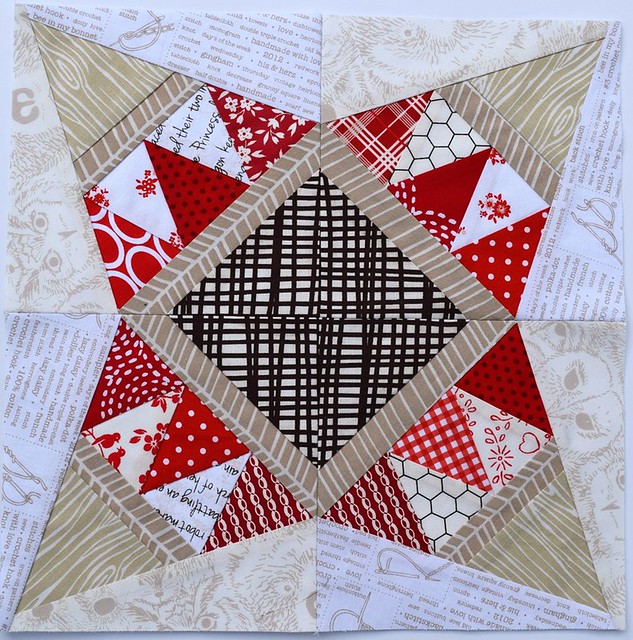
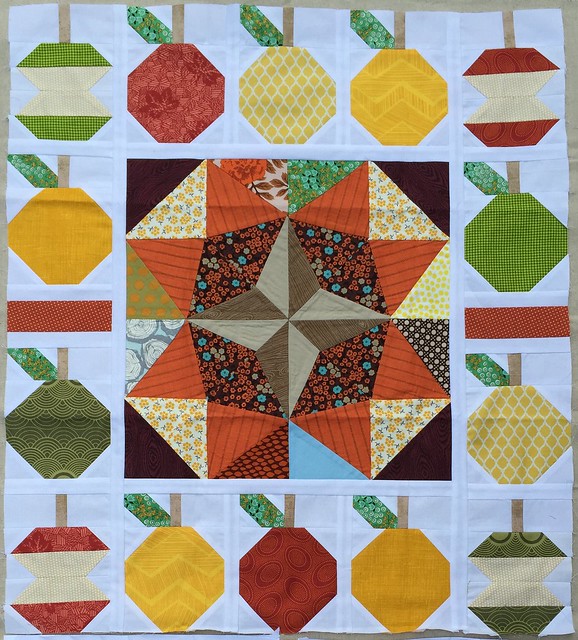
Kim at Ties that Bind Quilting added the first round to this quilt.  She added apples all around the center, which is so perfect for fall!  When I pulled the quilt out of the package, I had two immediate thoughts.  1 – this is awesome and 2 – this is huge for only being the second round!

Round Trip Quilts - Christina

As I said before, I was actually stymied by how many directions I could take this quilt!  I even had a misstep before deciding on the final choice.  My first attempt were some freeform pumpkins, that while I like them, I did not like them with this quilt.  It’s alright though – they will make some pretty sweet placements for next fall.

Round Trip Quilts - Christina
Quilting FAIL

I actually hate them less in this photo than I did initially.  Ironically, the linen I laid down so that I didn’t get the quilt dirty would have made a nice border and made them sort of work even though the style is still wrong for where the quilt is right now.

Round Trip Quilts - Christina

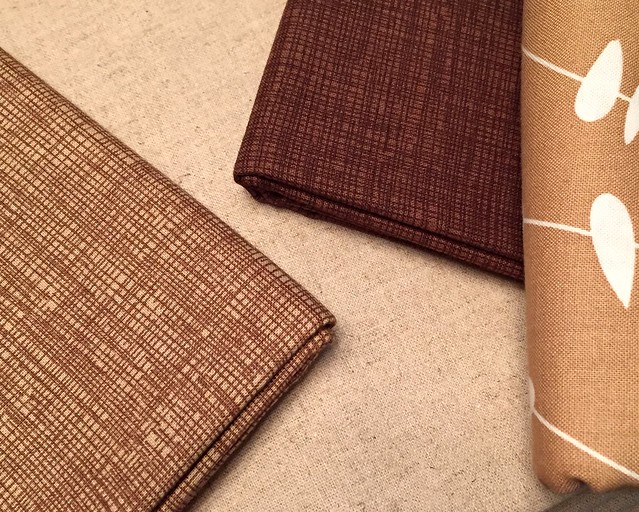
Next, I asked Christina on Instagram (with this selection of brown fabric) how she felt about squirrels because she had mentioned woodland creatures as a possible inspiration topic.  Squirrels (or bunnies as my daughter calls them), are a very popular topic in our house.  The squirrels in the backyard are entertainment during most meals, and there is a Curious George episode that features squirrels that she absolutely loves.  Thus, when I found the squirrel pattern from During Quiet Time, it seemed like a perfect option.  Plus, Christina had ok’d it as an option.

paper pieced squirrel

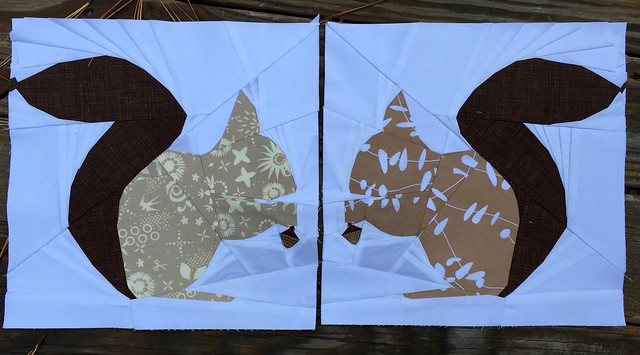
I reverse printed one squirrel so that the two squirrels could be facing each other.  I wish I would have taken a picture of the back before I peeled the papers off, because all those reverse printed letters and numbers looked pretty funny.  Although, because I was making two at the same time with such similar colors, having one set reversed was a lifesaver so I didn’t connect the wrong parts!

I did have a moment of doubt as to the scale of these two guys.  These blocks are 12″ square.  They are pretty large squirrels.  I considered reducing the size, but due to the paper piecing pattern, if I had done that there would have been some spots that I never would have gotten the paper out of.  Then, I felt better when I considered that the squirrels are actually is really good proportion to the size of the apples.  Christina, I hope you feel the same way!

Fall Quilt

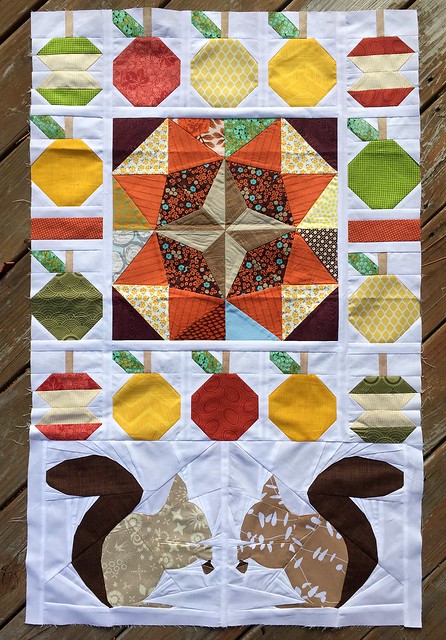
Next I just had to add some sashing at each side and in the middle so that the squirrels lined up properly with the rest of the quilt, and I was ready to pass this quilt on!  This quilt moves on to Liz at Green Cheese Quilting next and I can’t wait to see what she does with it.

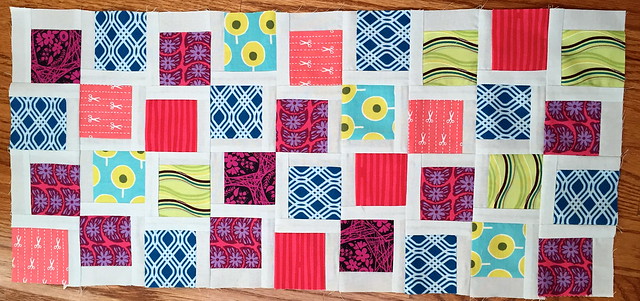
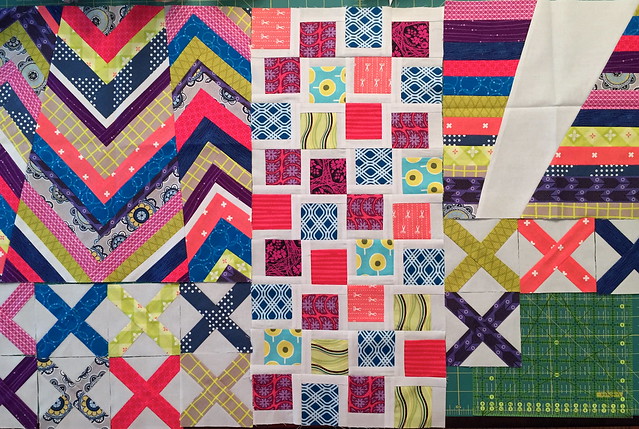
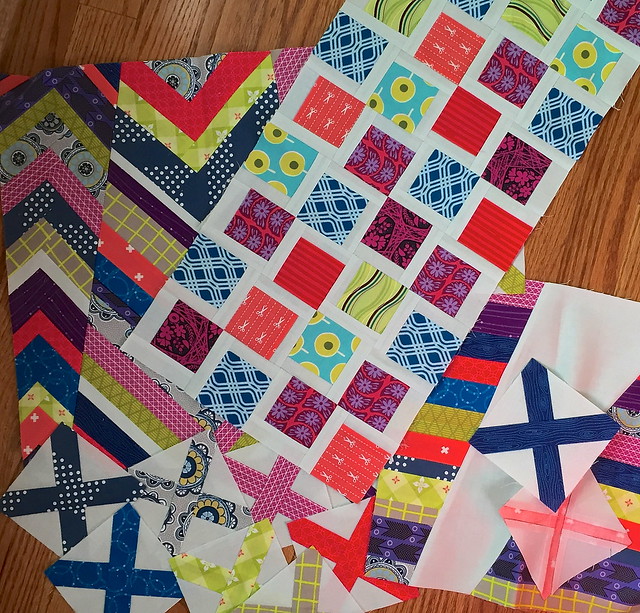
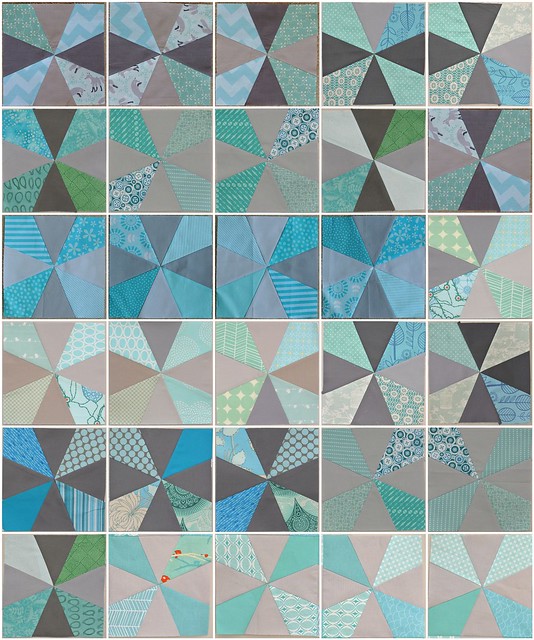
The next quilt I received is the center from Chelsea at Patch the Giraffe.  She picked a really soothing palette that I am looking forward to working with.

I hope everyone had a very Happy Thanksgiving!

– Heather


Linking up to some of the following: Anything Goes MondayFabric Tuesday @ Quilt StorySew Cute Tuesday @ Blossom Heart QuiltsWiP Wednesday @ Freshly PiecedLet’s Bee Social Wednesday @ SewFreshQuiltsNeedle and Thread Thursday @ My Quilt InfatuationWhoop Whoop Fridays @ Confessions of a Quilt AddictFabric Frenzy Friday @ Ft. Worth Fabric

Stash Bee Square Dance Quilt

This year I participated in the Stash Bee, an online bee made up quilters all over the world.  I was in Hive 12, and my month was May.  I asked the members of my hive to make me blocks from my Square Dance quilt block tutorial using the paper piecing pattern that I created for this project (now available on Craftsy).

Custom longarm quilting

Here she is – in all her glory!  The members of my hive did such an amazing job with their blocks.  The variety that they added to this quilt is what really makes it shine!  I will really enjoy sitting on the couch cozying up with this quilt this winter knowing that so many people helped make this quilt happen.

A huge thank you to Heather, Cheryl, Jennifer, Michele, Kristel, Laura, Toni, Genevieve, Francis and Willa!

Quilting progress

Above are some pictures of the quilting in progress.  To see more pictures, please see my Quilts Actually blog post about the quilting of this Square Dance quilt.

quilt binding

This quilt was a little rushed because I was working to complete it before the fair.  The binding and I spent some late nights, a lot of time in front of the TV, and an all day guild meeting together in order for it to get done.

Hand sewn quilt binding

It was worth all the work though… I finished it in time to enter it in the North Carolina State Fair, where we earned 2nd place in the Group quilt category!  I’m going to say we were robbed… just kidding… I didn’t actually see the 1st place quilt, so the possibility does exist that it was better.

State Fair Quilt

Once I was able to pick up the quilt after the fair, it seemed like everyday was sunny or rainy so it I had to wait quite awhile for a nice overcast day to take proper photos.  Luckily, our fall colors were at their peak, making a nice backdrop.

Square Dance Quilt

The back of the quilt really shows the quilting in detail.  I also added a few extra blocks in a strip along the bottom.  I love that little pop at the bottom!  I was also quite proud of myself for adding the hanging sleeve right away (granted…it was forced because I wanted to enter it in the fair), but usually I wait forever and don’t have any backing fabric leftover to use.  The sleeve looks so much nicer in matching fabric!

Note to self: make the hanging sleeve when you first finish the quilt from now on.

Custom quilting

This is my Stash Bee Square Dance with my miniature quilt Square Dance.  These two quilts have earned a few second place finishes – North Carolina State Fair, Quilting in the Pines Quilt Show, and Floral Fantasy Quilt Show.

Award winning quilts

Finally, a photoshoot out-take…  My daughter was “helping” to arrange the quilts just like mom.  Maybe I have a future quilter on my hands!  Or a photographer…

little girl quilt

Thanks for stopping by!

-Heather

Linking up to whoever has the link up post this week of the following:

Anything Goes MondayFabric Tuesday @ Quilt StorySew Cute Tuesday @ Blossom Heart QuiltsLet’s Bee Social Wednesday @ SewFreshQuiltsNeedle and Thread Thursday @ My Quilt InfatuationFinish it up Friday @ Crazy Mom QuiltsWhoop Whoop Fridays @ Confessions of a Quilt AddictTGIFFFabric Frenzy Friday @ Ft. Worth FabricShow off Saturday at Sew Can SheSewing Saturday at Simple Simon & CoStash Bee Link Up


Oliver and S Roller Skate Tunic Pattern Review

I’m continuing my Kid’s Clothes Week theme of fall useful clothing with my Roller Skate Tunic Pattern Review.

Roller Skate Tunic Pattern Review

Pattern: Oliver and S Roller Skate Tunic and Dress (digital version)  This is a great pattern for the digital side, because there is not that much to print.  It was a nice change from some of the huge patterns I have printed off lately.

Pattern Description (from designer): This cute and easy dress can also be made as a tunic, with two different styles for each length. All views include built-in cap sleeves, Empire-waist elastic casing, and keyhole-with-button opening at back.

Fabric Required: For 12-18 month size, 3/4 yard of both the lining and outer fabric.  One button for the back closing… a lion button makes any kid’s shirt better!

Oliver & S Roller Skate Tunic

Amount of fabric used: I’m pretty sure I could have cut it out of a half yard cut of fabric.

Sizing: My daughter’s chest size matched the 12-18 month size exactly, so I made the 12-18 width with 2T length.

Alterations: The only change I made was to add some length.

Instructions: This is a pretty simple shirt to construct, and the instructions are good (as always from Oliver and S).  The marking of the line where the elastic casing goes was a bit tedious, but there are better tools that make it easier (I just don’t own them).  The method to use carbon paper and a tracing wheel would be infinitely faster, easier, and more accurate.

Pattern Issues: I measured the elastic to be the exact width of her chest (plus the seam allowance) as directed, but I think it’s a little tight.  Not uncomfortable tight, but when she lifts her arms, the shirt rides up and stays up.  In my next version I will make the elastic a little bit looser so it hopefully won’t have that issue. You can see what I mean in the picture below…

Oliver & S Roller Skate Tunic

Fabric Choice: I used quilting cotton for the outside and voile as the lining.  The weight works well together.

Finished Product: Overall, I think it’s a cute shirt.  I already have another one cut out, it just needs to be sewn up.  I think with the cutout, the neckline is a little low on my daughter.  Maybe for her size, it gets low proportion wise?  I’ve seen a lot of other versions of this dress and never had thought before, but sometimes there is a little more food stuck in the top after a meal than is ideal.  Until she gets into larger sizes I don’t plan on using the cutout again.

Husband’s opinion: He doesn’t like how it rides up, but hopefully loosening the elastic will take care of that.

Notes for future makes: As stated above, I will make the elastic  a little bit looser in my next version and probably not use the cut out option until she is a little bit older.

Oliver & S Roller Skate Tunic

Final Thoughts: The Roller skate tunic is a well designed pattern that creates a good looking dress.  I like how it is lined, and think it is a very flattering and cute silhouette for a little girl.

Also, the pants are the Oliver and S Sandbox Pants that I made for the Winter 2014 KCW (last January).

Izzy Top Review

Here in North Carolina, fall sewing looks a lot like summer sewing for a good reason.  Last week, I think we had about 80 good reasons to wear short sleeves and still sew short sleeves this far into fall.  Therefore, my latest project and review is the free Izzy Top from Climbing the Willow.

This is also the unofficial start of Kid’s Clothes Week for me!  We have some family stuff next weekend, so in my personal version, KCW runs from 18-24 October instead of 20-26 October.

Izzy Top

PatternIzzy Top from Climbing the Willow.  Available for free in sizes 18 months – 12 years.

Pattern Description (from designer): The Izzy Top is a sweet, feminine curved yoke top pattern that closes with a button (or snap) tab in the back.  It is a very simple pattern to make and only requires basic sewing skills.

Fabric Required: 1/2 yard of main print, 1/4 yard lining for 18 months and 2 years.

Amount of fabric used: every last bit of 1/2 yard of the main fabric.  I had to actually reduce the width of the flared portion to fit in a half yard.

Izzy Top

Sizing: The 18 month size is recommended for a 19.5 inch chest.  The designer also mentions that she designed it to fit true ready to wear sizes.  I think that is pretty accurate.  My daughter’s chest is 18.75 inches right now, and I’m glad I have the little bit of ease because it makes it easier to get on and off.  Also, my daughter has a huge head and needed every bit of the neckline to get it on and off.

Alterations: I added 1.5 inches to the length because my daughter is about a 2T in height.  I used a snap for the back enclosure because I didn’t feel like doing button holes.

Izzy Top

Instructions: The instructions were good.  There are pictures for every step.  The only change I made was to baste the bodice to the skirt portion prior to serging them together.  I basted one one top, and did not on the other and the one I basted first turned out nicer.  Most shirts/dresses I have made in this style have the seam mid-chest enclosed, and at first I was annoyed that it was not, but the seam doesn’t seem to bother my daughter and it was faster a little bit easier to serge the seam.  If you don’t have a serger, you would probably want to lengthen the lining piece about half an inch to be able to enclose the seam.  Or you could do a french seam, or a flat felled seam there as well without issue.

Izzy Top

Pattern Issues: None.  This is a free tutorial, and I think for it being free, she did a great job!  The pattern fit as advertised, there are photos for every step, and it is a cute shirt.

Fabric Choice:  One shirt was a Lisette voile from a year or two ago.  The other shirt I made from chambray dots.  I purchased it in person at Mulberry Silks in Carborro, NC, but I’m pretty sure this burgundy chambray dot is the same one.  It’s a heavier weight than the voile, but still works well for this shirt.

Izzy Top

Finished Product: This is an adorable shirt for a toddler.  The shirt is a little wide for my taste.  I prefer the blue one that I didn’t have enough fabric to make the full width, so I will probably reduce the width again when I make this in the future.

Izzy Top

Husband’s opinion: Likes it, but agrees that the full width is a little too full.

Final Thoughts: This is a well put together tutorial in a wide range of sizes that I will most likely make again as she grows out of the current versions.  I even like it as it gets colder because I can either layer it over a long sleeve shirt, or put a cardigan over it.  I think in the spring I would like to try it with a knit for the bottom portion.

Notes for future makes: Reduce the width of the bottom portion.  I think in the spring I would like to try it with a knit for the bottom portion.

Round Trip Quilts, round 1

I am part of the Round Trip Quilts group that formed from the New Blogger Group that Plum and June does every year.  We are 8 ladies from the US and Canada that will be making round robin quilts over the next year.  We just finished up the first round of the round robin.

I had the fortune to start on Kim’s quilt.  Kim blogs at Ties That Bind Quilting.  Kim explains the start of her quilt in this blog post, Introducing Round Trip Quilts.  Her inspiration is a color story, and she sent quite a few bright, saturated, and (in my opinion) pretty awesome blocks blocks to start her more modern round robin.  You can see what I received below:

Round Trip Quilts, Round 1
It was such a bright, cheery palette that I just stared at it for awhile.  I had a hard time trying to decide what to add to it that would make sense and be appropriate for her quilt.  Adding on to someone else’s quilt is a big responsibility!  I’d never felt quite this challenged when making my own work, but I was nervous to do something Kim wouldn’t like.

I kept going back and forth about what to add, and then I would second guess all my ideas.  So, I decided to start by pulling fabric and move on from there.

Round Trip Quilts, round 1

When I asked Kim’s opinion on Instagram (she is tiesthatbindquilting), she said she liked the blue streamers that are second from the bottom and the top purple and pink AMH the best.

I moved on to more research, stalking her pinterest account and researching tons of blocks.

Then, one afternoon I was going through my quilting books trying to decide which ones to keep and which ones to find new homes for, and saw the cover of “Fresh Quilting” by Malka Dubrawsky*. That sewing machine cover on the top right just seemed like the perfect fit for what I was looking for!

Fresh Quilting by Malka Dubrawsky
I started chopping up my chosen fabrics into squares, and adding the sashing.  Once I started, it was like I couldn’t stop!  It was such a relief to figure out what I wanted to do.

Round Trip Quilts, Round 1

I debated assembling the blocks.  I would have sewn together the sections on the left side of my block, to my block, but the sizing didn’t quite work out and I didn’t want to cut any blocks yet because someone later might make something that fits better.

Round Trip Quilts, Round 1

Mostly, I was just excited that my block looks like it fits in when Elizabeth from Green Cheese Quilting pulls it out of the envelope!

Round Trip Quilts, Round 1

If you want to see more, Round Trip Quilts has a Flickr group and you can follow us on Instagram using #RoundTripQuilts!

The full list of members is below:
Heather at QA Creations
Leanne at Devoted Quilter
Kim at Ties That Bind Quilting
Liz at Green Cheese Quilting
Mary at See Mary Quilt
Christina at WIPs and Tuts
Jennifer at Never Just Jennifer
Chelsea Huckins at Patch the Giraffe


Linking up to: Fabric Frenzy Friday @ Ft. Worth FabricWhoop Whoop Fridays @ Confessions of a Quilt AddictTGIFFAnything Goes MondayFabric Tuesday @ Quilt StoryWiP Wednesday @ Freshly PiecedLet’s Bee Social Wednesday @ SewFreshQuilts

* I’ve signed up to be an Amazon Affiliate.  I won’t get rich anytime soon because it gives me less than $0.50 if you buy a book that I link to (within the 24 hour window that you click on it), but I’m hoping that it may help at least offset my web hosting fees.  It doesn’t change your price to purchase, so if you do decide to buy any books I link to, thanks for the support!

Summer Stash Bee Blocks

I kept up with my summer bee blocks, but not with sharing them!  Hive 12 of the Stash Bee has had some great blocks since March (the last time I shared), so enjoy 🙂

April was Michele’s month, and she wanted bright dresden plates with dotty fabric.  Her April Hive 12 tutorial is here.  She found a video that gave instructions to make the blades from charm squares!  It is a good way to use up those charm squares that everyone has laying around.  I would like to try this block again with a traditional ruler someday to see the difference in how it turns out.  She has put her quilt top together, and you can see “A Wee Bit Dotty” here.

April 2014 Stash Bee Hive 12

May was for me, and I have the quilt top put together, but need to make a backing so I can quilt it.  My Square Dance Tutorial is here.  Below are the blocks I received from the group, and then I made what seemed like a million more (but was really somewhere in the 30’s) to make this a decent sized lap quilt.  Lesson learned:  This block should be make in groups of 10, but no more than 12.  I think I did one round of 16 at a time, and that was too many for me.

May Stash Bee Blocks Hive 12

June was for Kristel from Work in Progress Girl.  Her June Hive 12 Tutorial is here.  She wanted brightly colored solid churn dash blocks to help finish up a WiP.

June 2014 Stash Bee Hive 12

July was for Laura from SewFrouFrou Quilter.  Her July Hive 12 Tutorial is here.  She called her block ROYGB Geese.  This is going to be a colorful quilt!

July 2014 Stash Bee Hive 12

August was for Toni.  She wanted a double pinwheel variation, as shown below.  Her August Hive 12 Tutorial is here.  I can’t wait to see this top put together, I think the patterns created when these are assembled are going to be fantastic.

August 2014 Stash Hive 12 Block


September was for Genevieve.  She wanted any style block that went with a variety of blocks she already had made to turn into a sampler quilt.  I saw a lot of orange, turquoise, some blue and green, and some pink, so I tried to make a block that hit those color ways.  I used the Corner Star tutorial from Modify Tradition.  Her block has the star centers as white, but when I laid the block out, that just looked like too much white for what Genevieve already had done so I changed the centers to be colored.

September Stash Bee Hive 12


Thanks for the fun ladies!

– Heather

Linking to:

Fabric Tuesday @ Quilt StorySew Cute Tuesday @ Blossom Heart QuiltsLet’s Bee Social Wednesday @ SewFreshQuiltsWhoop Whoop Fridays @ Confessions of a Quilt AddictFabric Frenzy Friday @ Ft. Worth Fabric


Schnitzel & Boo Mini Quilt Swap

Round 2 of the Schnitzel & Boo Mini Quilt Swap finished up awhile ago, but I never shared my project until now.  I was checking the draft section and realized this post never got published, so here’s to catching up!

Schnitzel & Boo Mini Quilt Swap

My partner likes bright rainbow colors and the simplicity of Alissa Haight Carlton, the colors of AMH and Allison Glass, and Tula Pink’s quilt designs.  I hope this lives up to all of that!

Schnitzel & Boo Mini Swap

I was very inspired by “Every Color” by Alissa Haight Carlton.

Noodlehead Open Wide Zipper Pouch

I also included a little pouch made from the Open Wide Zippered Pouch Tutorial by Noodlehead and some bits of True Colors by Anna Maria Horner.

Quilt Label

From my “stalking” I discovered my partner’s favorite colors are aqua and pink, so I included that on the back.  I also tried printing on fabric for the first time for the label, and it was so easy!  I used this tutorial for printing on fabric using an inkjet printer.  I am not sure how this works for labels that need to be washed, but for a mini that will hang on a wall, I think this method works great!

I hope you liked this partner!

In return, I received this sweet heart mini with some treats from Pure Joy Creative.   That aqua fabric was used up with a week or two, so never fear that it is sitting unloved in a stash somewhere!  Thanks for the wonderful mini quilt swap!

-Heather

Linking to: Fabric Tuesday @ Quilt StorySew Cute Tuesday @ Blossom Heart QuiltsLet’s Bee Social Wednesday @ SewFreshQuiltsNeedle and Thread Thursday @ My Quilt InfatuationWhoop Whoop Fridays @ Confessions of a Quilt AddictFabric Frenzy Friday @ Ft. Worth Fabric, and Sewjo Saturday at My Go-Go Life.


Starting the Journey: Round Trip Quilts

During the Plum and June New Blogger Hop, several bees were started all over the world.  I’m taking part in a US/Canada based round robin bee called Round Trip Quilts.  We are starting this long journey this week as we mail the start of our quilts to the first person.

I went through many ideas for what I wanted this quilt to be.  I considered an ode to North Carolina (where we’ve lived for 5 years now – amazing for an Army family!), a sewing themed quilt for me, but landed on a quilt for my daughter.

Paper Pieced kind and strong

While preparing for a different idea, I decided I wanted to paper piece the phrase “be strong”.  Once my husband and I saw how great it looked, we started coming up with tons of other ideas for these phrases to include in the quilt.  Then, I realized that instead of just one of these phrases in my quilt, I wanted the theme of my quilt to be based on this.

While trying to come up with some more possibilities, I googled the phrase “wishes for my daughter“.  That’s when I knew what this quilt was going to be. This quilt is going to be called “Wishes for my daughter.”

I have provided paper pieced phrases to be scattered throughout the quilt.  I want the other members of the bee to create blocks or sections to separate the phrases.

Paper pieced Care

This isn’t really the traditional “center” that usually start a round robin, but I really loved this idea and hope everyone else enjoys working on it as well.  I don’t have a preference for how they separate the phrases – it can be pieced blocks, paper pieced designs, row by row style blocks, or anything else I can’t even dream of!  I think this will turn out really cool.  Then at the end, I will hopefully be able to size this up to a twin size quilt by adding some of the longer phrases that I did not have time to paper piece before the first mailing.

I suggested filling in the spaces with things a little girl would like… such as animals (red fox is currently a hit in our household), flowers, fruit, flying objects (birds, butterflies, airplanes), deer, dogs, outdoors, and traditional pieced blocks.  To include Mom and Dad, I mentioned that I like sewing and Dad likes fly fishing.

Paper pieced love

In case anyone wants the details of these phrases, I used the “Just my type” alphabet pattern from Quiet Play.  It looks great, but takes quite a bit of time!  I printed the pieces at 120%, which makes them 6 inches tall.  I wanted the letters inside of the words closer together so I cut the edges off 3/4″ from the edge of the letter.  I usually used the full width of the pattern for letters that started or ended words.

Paper pieced boat

My contribution to the “center” is this sailboat.  I was fortunate enough to sail quite a bit growing up (although on nothing near as fancy as this boat!), and so counted it as something I like to fit in with the phrases.  This pattern is from Daisy at Ants to Sugar, and she will be releasing this pattern on Craftsy soon.

I’m super excited to see what everyone comes up with.  There are already some amazing things floating around on instagram and flickr.  Round Trip Quilts now has a Flickr group and you can follow us on Instagram using #roundtripquilts!  You can also find a summary of all of our posts on Never Just Jennifer’s Round Trip Quilts page!  Eventually, I’ll get this on my blog too – but for now check out how organized she is and marvel 🙂


The full list of members is below:

Heather at QA Creations

Leanne at Devoted Quilter

Kim at Ties That Bind Quilting

Liz at Green Cheese Quilting

Mary at See Mary Quilt

Christina at WIPs and Tuts

Jennifer at Never Just Jennifer

Chelsea Huckins at Patch the Giraffe


Linking up to: Anything Goes MondayFabric Tuesday @ Quilt StorySew Cute Tuesday @ Blossom Heart QuiltsWiP Wednesday @ Freshly PiecedWhoop Whoop Fridays @ Confessions of a Quilt AddictFabric Frenzy Friday @ Ft. Worth Fabric


Jewel Puzzle Paper Pieced Pattern

Jewel Paper Pieced Tutorial

Free paper pieced pattern for 12″ finished block that includes detailed photographic instructions on how to paper piece.

Today, my new Jewel Puzzle paper pieced block pattern was featured on Sew Mama Sew!  Head over to Sew Mama Sew for the Jewel Puzzle Tutorial.

Jewel Puzzle Block

This paper pieced pattern is probably a solid intermediate level… not too hard because there aren’t a lot of intersections to match up, but a lot of pieces for a true beginner.

I made this block to use a pillow in my daughter’s new room.  I wanted something bright and cheerful, and I think this block does just that.

I also made a version of this block for my Red & White Sampler.  It amazes me how different these blocks look with some different fabric and different fabric placements.

Red Jewel Puzzle Block


If you make this block, please let me know because I would love to see your work!  I’ve started an Instagram tag for #jewelpuzzle block, or you can email me a picture.

– Heather

Also linking up to:

WiP Wednesday @ Freshly PiecedLet’s Bee Social Wednesday @ SewFreshQuiltsWhoop Whoop Fridays @ Confessions of a Quilt AddictFabric Frenzy Friday @ Ft. Worth FabricShow off Saturday at Sew Can SheSewing Saturday at Simple Simon & Co,  Anything Goes MondayFabric Tuesday @ Quilt StorySew Cute Tuesday @ Blossom Heart Quilts


Around the World Blog Hop

Last week I was invited by Sarah of Berry Barn Designs to participate in the Around the World Blog Hop.  As a fellow military spouse, it seems appropriate to share in the tour because of all the places we’ve been and could end up.  I’m so happy she thought of me, and now it’s my turn to answer the interview questions and to pass the torch 🙂

Schnitzel & Boo Mini Swap

What am I working on?

Or, is the better question what am I not working on?

– I owe my August Block to Toni for Stash Bee Hive 12.  I have some black solid fabric now, so I better get started.

– I am starting a round robin bee with some amazing ladies from the Plum and June New Blogger Hop 2014.  I think I finally decided on the design, so now I need to sew it because I’m supposed to mail it off September 1st.

– I entered 4 items in the Sandhills Quilt Guild 2014 show.  Three are quilts and need hanging sleeves attached.  One of the quilts needs the binding finished.  The bag I’m entering needs the lining sewn in.  All this has to be done so I can drop them off by September 12th.

– I started the Spell it with Moda quilt about 6 months after everyone else finished theirs.  We finally made a room for my daughter, and it will look perfect on the wall.  I am halfway done with B and C so far.

– I need to make my guild name tag now that I have the embroidered part.

– I also started a shirt today.  I have too many quilty deadlines, so I needed to sew something for me!  It’s Sewaholic’s Belcarra Blouse, part 3.  One of these days I’ll get around to showing off part 2, and now this one I made today.

How does my work differ from others?

That is a hard question in quilting because everyone’s work is already so varied.  I think it’s hard to truly have such a unique style that someone looks at your quilt and immediately knows that it was yours.  There are a few quilters that I can think of that pull it off, but most of us are not that way.  I think my style is still developing.  I started out very traditional, but am moving more toward the modern side.  I love bright, modern fabrics.  But I also love the detailed traditional quilt blocks.  I think my style is still developing.  I love all the different styles out there too much to stick to just one!

Tombstone  (Cora's Quilts Spring Sampler)

Why do I create?

I love to sew.  I don’t know why or where it came from, but I love the satisfaction that comes from sewing.  I love picturing what I want it to look like, and then making it.  I’m also very picky, so I like that I have control over what I’m making.  Then, there is also sanity.  Sewing calms me, it’s my version of zen.  If I haven’t sewn in awhile, I feel almost antsy.  It’s my refuge in my stay at home mom life.

Spinnaker Quilt

How does my process work?

I get inspiration from everywhere.  The roofline on an old mansion, a tile floor, instagram, blogs, pinterest, antique quilts, fabric.  I have a million ideas in my head waiting for the time to come out through my hands into my sewing machine.  I decide what to actually make based on more practical concerns.  What do I actually need?  I need a quilt for my queen sized bed – I’m working on the Real World Red & White Quilt to fill that need.  If my daughter needs leggings, I make leggings.  If I’m tired of my current clothes situation, I will make a shirt.  I have so many projects in the queue that I just adjust the order for what actually makes sense to create.

Oliver & S Class Picnic Shorts

On a more practical level, once I get an idea for a quilt into my head, I will generally sketch it on paper.  If I plan to turn it into a tutorial or pattern, I will put it into the computer.  I generally leave it black and white.  I do color tests with the actual fabric by arranging them so that they touch in as close a manner to the pattern as possible.  At that point, I usually am happy with the arrangement and proceed to cutting and sewing.  I like to chain stitch and do multiple blocks at the same time.  However, I find that if I cut out an entire quilt at once, I am generally too bored with it by the time I’m done cutting to actually sew it.  I work best by sewing about 10 blocks at a time (depending on size or intricacy, bigger or more intricate blocks will be fewer than that).  Once I have the top done, I am generally tired of it so I often leave off the border and wait months to piece together a back.  Quilted tops have sat waiting for binding for as long as a year.  I’m really good at finishing the top, but the back and binding can and will linger for awhile.

Finished Pandora's Box

Please check out the others Sarah linked to today: Heidi from Fabric Mutt and Mara from Secretly Stitching.

And now I am going to pass the torch to the ladies of my new round robin bee.  Once I see who wants to play, I will update with their info.  Thanks for stopping by!