How to sew a baby Santa Hat tutorial

I was searching for a tutorial on how to make a baby Santa hat, and found crochet and knitting tutorials and patterns galore but nothing for sewing with knits or fleece.  I played around and made a couple cute versions for my daughter, so hopefully this very loose tutorial can help someone else.

If you choose to do the traditional santa hat, it is a bit easier.  I used a serger for this project, but it was really just because I have a new serger that I was excited and wanted to use.  A regular sewing machine would work just as well.

1. Measure your child’s head.  My daughter’s head was a little over 18.25 inches in circumference.

2. Make hat width about half of the child’s head size.  I made it 9 inches wide.  Cut bottom 9 inches wide, and then go up about 2 inches on the left and right sides of the hat.  For the band, cut white fleece rectangle 18 inches (double the red part’s width) by 6.5 inches.  Make sure the direction of stretch is widthwise when cutting all pieces.

3. Cut the angle for the Santa Hat.  I made mine 60 degree angles using the marking on my quilting ruler.  I just cut up and let them intersect.

4. I cut the top part off because of how I was attaching the fleece pom pom.  If you are hand sewing, I would just leave the angle and sew it on once completed.  Don’t try to serge the fleece with the pom pom in it.  Don’t ask me why I know that.  Just trust me… it’s not worth trying to do no matter how clever it seems.

Example pom pom tutorials: 

5. Sew together the red top angled part of the hat.  If you are using a regular sewing machine, a straight stitch would work for this part.

6. Sew the white rectangle band piece with right sides together on the short end.  Fold the band in half with right sides together.  Sew the white band and red hat together.  If you are using a regular machine, I would use a zig zag stitch for this part so that it will have some stretch to fit on your child’s head.

7. Fold the band down and it is ready for wear!

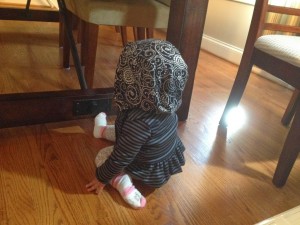
The skull cap version is a little bit more complicated, but not if you have a hat pattern.

Step one: Get hat pattern.  If you have a knit hat on hand that fits, you can trace it and then add seam allowances to get the proper size.  If you want to make a size 0-3 months, you can use the pattern provided at Zaaberry.  Her instructions on how to assemble the hat are very good and very well photographed, so I recommend using her tutorial for assembly.  
Step two: Cut out two hat pieces and one band piece.  The main hat pieces will be red and the band will be white.  Take care to make sure the direction of the fabric stretch is horizontal so that it can stretch and stay on your little one’s head.  
Step three: Make white pom pom or get pom pom for top of the hat.  Or buy some pom poms from the store, whatever is easiest.  Whatever method you use, make sure there is some thread or fleece or other method of attachment to sew into the hat.  If not, you can hand sew it on at the end.  
Step three: Prepare and Sew together the hat pieces.  Fold the hat piece in half and sew the cut out portion first.  Repeat for second piece.  Then put the right sides together and sew the half moon shape leaving the opening for the head.  Sew the rectangle band piece with right sides together on the short end.  Fold the band in half with right sides together.  
Step four:  Sew the band and hat together.

fleece baby santa hat

I originally had planned to sew a pom pom on the top, but it really fits better under a hood without one. The colors still read Santa hat without the pom pom.  Enjoy!

Linking up to: Make it, Wear it from The Train to CrazyFabric Tuesday at Quilt StoryYou Flew Tuesdays at Feather’s Flights, “We did it Wednesday” at Sew Much Ado and Friday Favs Party at Nap Time Crafters.

I love my new serger!

No seriously, I can’t believe I didn’t get one sooner.  I love my serger.  I have the super-basic Brother 1034D.  It was supposed to be my birthday present back in May, but I wasted months trying to figure out why there is such a price jump in sergers and if the more expensive ones are worth it.  I chose to get a basic serger and then I will get a cover stitcher at a later date.  The combined cost will be less than many of the fancy sergers I was considering.  Despite all my debating, I finally got my serger and I love it!

Why do I love it?  It is amazingly fast, and the finish looks great.  It is also easy to use.

I was a little intimidated at first, mostly because people talk about how hard sergers are to thread and to get the tension correct.  I watched the video tutorial, and then set out to serge.  I was a little upset at first because out of the box, the thread kept breaking and it was not working like the video.  Then I discovered one of the spools had the edge with the cut in it up, so the thread kept getting caught and breaking.  One of the bonuses of this almost tragic frustration is that I got really good at threading it almost immediately.  In fact, I prefer rethreading it when I change thread color to doing the tie and pull thread through method that even the video recommended.

How did I get to love my serger so fast?  I used it on real projects to learn.  I know people advise you to practice on scraps first, but I get bored.  So, after about 12 inches of sewing on scraps I jumped to real projects.

I had two knit projects cut out ready to go: the Bimaa Sweater (LouBee Clothing) and the Lily Blazer (Peek-a-boo Pattern Shop).  It turns out I did not choose the easiest projects – not that the patterns are difficult in any way – I chose difficult fabrics.

For the Bimaa, I chose the lightest knit ever from JoAnn Fabrics.  I made a 2T, because my daughter’s measurements put her in the 12 month size but I’ve read that it fits tight and I wanted it to fit over onesies.  I should have done the 12 month length with the 2T width because the body and sleeves are about 2 inches too long.  Oh well, room to grow right?

I followed the advice from the video tutorial to change the feed differential to 0.7 for light knits and had no issues putting the Bimaa together.  The serger goes so fast I had to get over my quilter’s need to pin every two inches (and more often on curves).  I felt very proud of my first knit garment when I finished it.  There are a few seams that are not as attractive as they could be on the starts and stops, but it’s a learning process.

The only odd thing about this pattern is that the hood is huge!  My daughter has a large head – like 96th percentile huge head – and she swims in it.  It is also so big that it pulls the shirt too far back because of too much fabric weight, so it pulls at the neck.  If I were to ever make this hoodie in the smaller sizes I would probably try to draft down the hood a little.  Most likely, I just won’t make the hood option again until she is older.  I will probably do the shawl option next.

For the Lily Blazer I chose a beautiful stripe that I am pretty sure I also got at JoAnn Fabrics.  Knit stripes are probably not a good choice for a second garment ever made on the serger, but I went for it!

Most of the stripes ended up matching, so I’m pretty happy with it.  I made the 12 month size.  I love the ruffle on her butt when she is crawling around.

The only other change I made was to use snaps instead of buttons because they are easier to dress her with.

The way this is constructed it becomes fully lined when you are done which is very nice.

My only complaint is that the sleeves are too long with the cuff.  I should have followed the baby example the pattern came with where the designer didn’t add the cuff and just hemmed the sleeves.  Then, the length would have been perfect.  As is, I fold the cuff up completely and the serged edge shows.  The black thread against the dark fabric isn’t really noticeable so in reality, I’m probably the only person that will notice.

I can’t wait to keep using my new toy!

Linked to: Make it, Wear it from The Train to Crazy, Fabric Tuesday at Quilt StoryYou Flew Tuesdays at Feather’s Flights and Friday Favs Party at Nap Time Crafters.

Kids Clothes Week, Fall 2013

I was very excited to participate in Kids’s Clothes Week for the first time!  This is pretty much what I got done for the week, but I was showing real time progress over on Instagram throughout the week.

First, the plan.  There have been many versions of the plan.

Version 1 – make 3-4 bonnets to last through winter into spring, 2 O+S seashore dresses, and a fall themed pinafore.   Now, why did it seem like a good idea to make two O+S summer dresses in October?  I wanted one as her Army vs. Navy outfit, and figured while I was at it I should also make the next size up for next summer.  I wanted the upper portion embroidered with the Army logo, but after many hours of searching I realized West Point has its copyrights locked up so tight you can’t even find a legitimate way to do what I wanted to do.  Also, realistically we are going to be sitting on our couch watching the game so it doesn’t matter what she wears.  Seashore dresses out.

Version 2 – I bought a serger (yay!), so what better time than the present to learn how to use it?  I saw Bimaas and leggings in my future.  Turns out the serger doesn’t come with thread and the instructions I need to watch on a windows computer.  My windows laptop died over a year ago.  Moving on…

Version 3 – Get ready for a Southern Winter Kids Clothes Week.  This still includes a bonnet and pinafore.  Now, I added flannel lined Quick Change Trousers, baby mittens, lumberjack hat, scarf, and O+S hood.  Neither winter hat was completed.

Pinafore: The pinafore needs two buttonholes.  In my defense, my regular machine decided it doesn’t want to sew without leaving huge thread nests from the bobbin so this was/is on hold while I bought a vintage buttonholer off eBay for my Featherweight, which is what I’m sewing on this week.

The pinafore is using the free pattern from Smashed Peas and Carrots.  I added the pockets on one side, and fall appliqué on the other side.  It is made of linen, and once I get buttons put on will be super cute. These in-progess pictures show the idea.

Side 1:

Side 2: 

Fall applique
Fall baby dress

Baby mittens- version one and two complete.  The concept is good, but my daughter has really long fingers so they just barely fit.  This was my priority because it was 40 degrees several mornings this week and she doesn’t like to keep her hands under the blanket.  I used the tutorial from Speckled Owl Studio.  The only challenge was that tutorial was really meant for newborn mittens to keep babies from scratching themselves as opposed to winter gloves, so I had to do some adjusting.  I used corduroy and fleece to warm them up.  I am still working on sizing because my second version was too large and she just pulled them off her hands in two seconds.

homemade fleece mittens

Bonnet- this bonnet makes my heart heavy.  I absolutely love how it turned out!  The problem is that it is huge!  Her old ones were getting small so I decided to go up two sizes, and it will not fit this winter.  Maybe next week I can face making another smaller one.  This matches the pinafore perfectly, so it would be a shame to not have her wear them together.

Handmade baby bonnet

Winter Quick Change Trousers: I used the pattern from Handmade Beginnings by Anna Maria Horner.  The last pair I made was huge, so I reduced the front piece by an inch on each side.  This was probably a little too aggressive, about 1/2 inch would have probably been perfect.  I also added the tuxedo strip for some fun.  The butt is also the gray elephant fabric, and I love the elephant butt on these!  The inside shown is flannel.  The large size is nice in winter because they do fit over her knit pants.  I used the width reduced 9 month size with 12 month length.

Handmade fleece lined baby pants
Fleece Booties: Also a must in the cold.  I used the tutorial from Dorothy Was Here.  I used the size exactly as is, and they fit my 8.5 month old perfectly.  I will probably have to size them up for another pair before the winter is over.  I would also like to try using the non-stick fabric on the bottom like she suggested, but I couldn’t find any at my fabric store during Kids Clothes Week.  
Handmade winter baby shoes

The combined result of this efforts is my little warm girl below 🙂  Although, we did add two more blankets because it was freezing this morning.  Not too bad for a week’s effort!  Kids Clothes Week has been a blast and I can’t wait for the spring version!

Edited to add:
Linking up to Show and Tell, Made By Hand, and Make It, Wear It.

Chambray shorts

I often feel like an impostor when I sew clothing.  I am self-taught and learn a lot of things the hard way.  Then, when I was watching Project Runway several weeks ago the winning designer (Alexandria) used chambray and the judges loved how she used the fabric!  It made me feel a little better about myself.  I am not an impostor when I used the same fabric in these shorts, and used it before Project Runway did.

Bubble Shorts

That is not to say I am by any means anything other than a beginning seamstress when it comes to clothing, but I think I make nice quality garments for my daughter.  If they weren’t, I would not let her wear them and I wouldn’t waste my own time to make them.  There are already too many cheap, ready to wear options to waste time and fabric on substandard homemade substitutes.  I aspire to fully support high quality and ethically produced clothing, but time and financial constraints exist.  That was slightly deeper than I originally meant to go.

blue baby shorts

Now, on to the shorts.  These are the ever popular Elegance and Elephants Bubble Shorts in size 6 months.  The fabric is a blue chambray that is a nice weight for baby shorts.  It was a little more challenging to sew with than regular quilting cotton because of the edges fraying more than I am used to.  However, the fraying issue was not bad enough to deter me from sewing with this fabric again.  It is enough of an issue that the seams need to be finished though.  I used french seams to finish mine.

My daughter’s favorite part of these shorts are the tie.  What’s better than a string to play with that you can’t drop or lose?

girl baby shorts

One final parting shot of her adorableness and the irony of childhood – every toy she could ever want and one of her favorites is an old remote.

Shorts with pockets

Linked to:
Fresh Poppy Design 125